Setting up your AI-augmented workflow for Product Management & Design
Working with Figma and Atlassian MCP to augment product workflows.
Setting up your AI-augmented workflow for Product Management & Design
Working with Figma and Atlassian MCP to augment product workflows.
The AI landscape is evolving rapidly, presenting exciting new possibilities for every field, including product management and design. While the future of AI-assisted workflows is still being written, setting up environments to experiment and explore is key to understanding how these technologies can best serve creators and strategists.
Tools like Figma for design and JIRA for issue tracking are staples in many teams. What if you could connect these tools to an intelligent AI interface, creating a space where you can experiment with AI-driven interactions tailored to your specific product and design challenges?
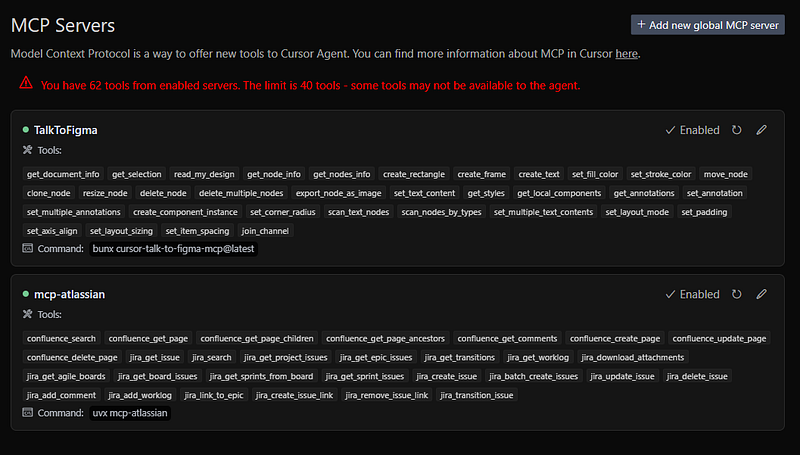
This is where Cursor, a tool for interacting with applications via natural language, and the concept of MCP (Model Context Protocol) servers come into play. The cursor-talk-to-figma-mcp and mcp-atlassian projects provide a concrete way to connect Cursor to Figma and JIRA, offering the building blocks for your own AI assistant playground and facilitating the flow of model context between these tools.
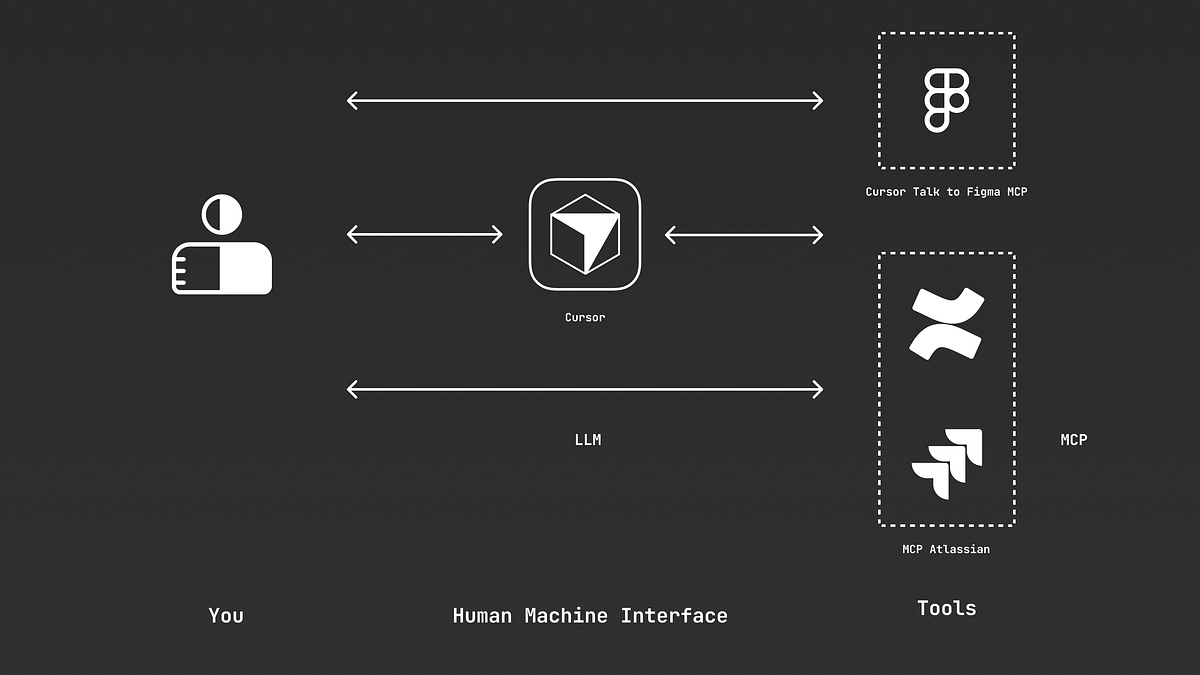
This setup isn’t about prescribing a rigid set of automations, but rather about creating a flexible environment where product managers and designers can experiment with how an AI assistant can understand their needs and interact with their core tools by providing and utilising context from these platforms. Let’s explore how to set up this playground and some initial areas for experimentation.
1. Install Cursor
2. Set up Cursor Talk to Figma MCP
Set up the MCP Server
- Clone the above repository
git clone https://github.com/sonnylazuardi/cursor-talk-to-figma-mcp.git
- Open the repository on your IDE (Cursor in this case) or navigate to the directory on your terminal.
cursor cursor-talk-to-figma-mcp
- Install Bun if you haven’t already: https://bun.sh/docs/installation
For Mac, Linux
curl -fsSL https://bun.sh/install | bash
For windows
powershell -c "irm bun.sh/install.ps1|iex"
- On the cloned repository, edit the
src/socket.tsUncomment the hostname0.0.0.0For Windows.
// uncomment this to allow connections in windows wsl
hostname: "0.0.0.0",
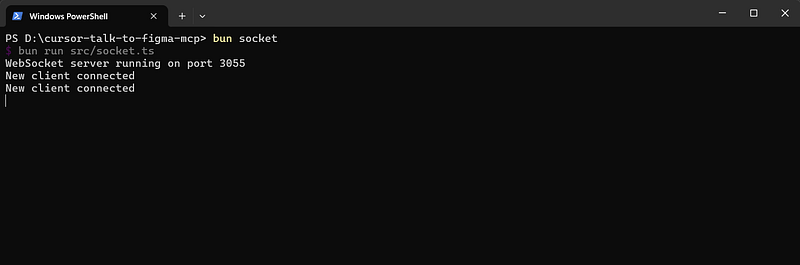
- Start the Websocket server.
bun socket
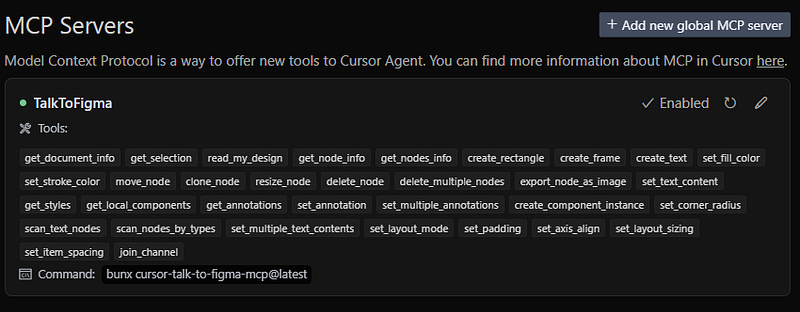
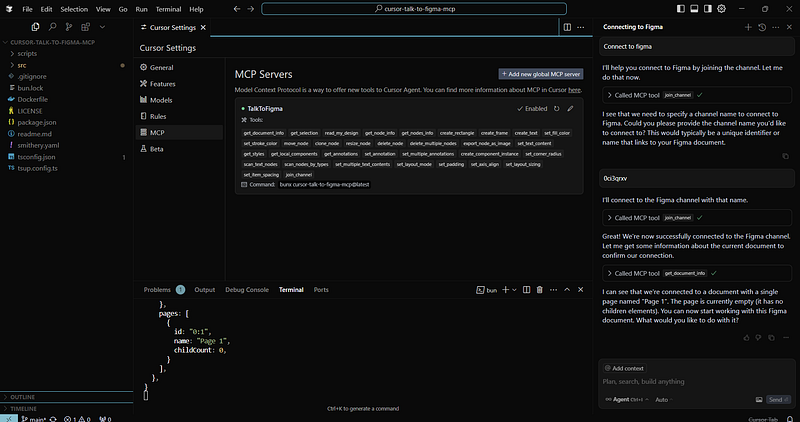
Add the MCP server to the cursor
File → Preferences → Cursor Settings → MCP → Add new Global MCP server
{
  "mcpServers": {
    "TalkToFigma": {
      "command": "bunx",
      "args": ["cursor-talk-to-figma-mcp@latest"]
    }
  }
}
Set up Figma Cursor Plugin
- Open the Figma app
- Open actions (Ctrl+k)
- Click Import plugin from manifest…
- Select cursor-talk-to-figma-mcp → src → cursor_mcp_plugin → manifest
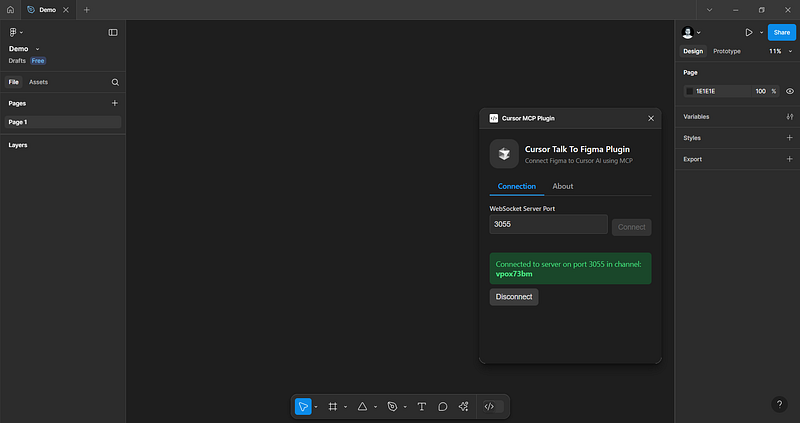
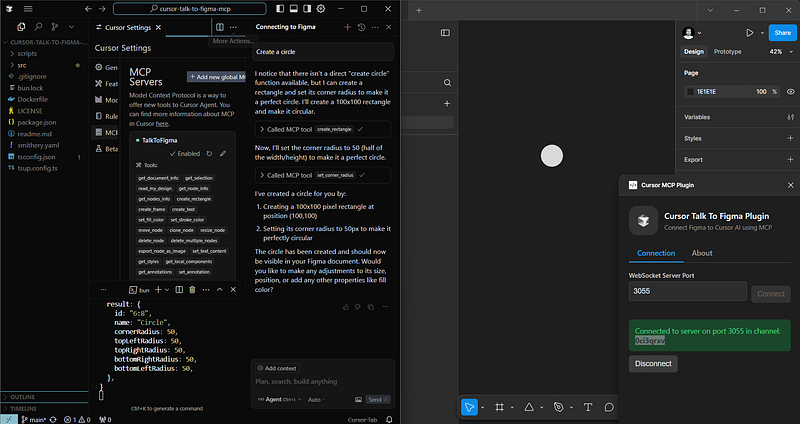
To test the connection, open the cursor chat (Ctrl+l) and type 'Connect to Figma'. When prompted for channel name, enter the name you see on the plugin on Figma. Once connected, you will be able to see the information on the file. Try creating a shape to see how it works.
3. Set up the MCP Atlassian
Get the API key from your Atlassian account.
- Go to https://id.atlassian.com/manage-profile/security/api-tokens
- Click Create API token, name it
- Copy the token immediately
Install the server
For Mac, Linux
curl -LsSf https://astral.sh/uv/install.sh | sh
For Windows
powershell -ExecutionPolicy ByPass -c "irm https://astral.sh/uv/install.ps1 | iex"
To install the packages
uvx mcp-atlassian
Add the MCP server to the cursor
File → Preferences → Cursor Settings → MCP → Add new Global MCP server
{
  "mcpServers": {
    "TalkToFigma": {
      "command": "bunx",
      "args": [
        "cursor-talk-to-figma-mcp@latest"
      ]
    },
    "mcp-atlassian": {
      "command": "uvx",
      "args": ["mcp-atlassian"],
      "env": {
        "CONFLUENCE_URL": "https://your-company.atlassian.net/wiki",
        "CONFLUENCE_USERNAME": "your.email@company.com",
        "CONFLUENCE_API_TOKEN": "your_api_token",
        "JIRA_URL": "https://your-company.atlassian.net",
        "JIRA_USERNAME": "your.email@company.com",
        "JIRA_API_TOKEN": "your_api_token"
      }
    }
  }
}
Make sure to replace https://your-company.atlassian.net/wiki, https://your-company.atlassian.net, your.email@company.com, and your_api_token with your actual Atlassian site URL, username (usually your email), and the API token you generated.
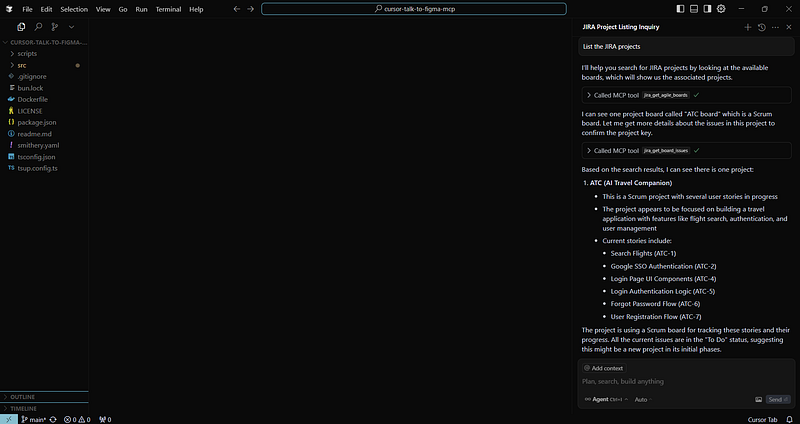
To test the connection, open the cursor chat (Ctrl+l) and type List the JIRA projects. You should be able to see the summary.
Tata! You have successfully set up the components needed to use Figma and JIRA with your AI assistant via Cursor. This is just the beginning, and while things might not work perfectly out of the box, this setup provides the foundation for building powerful AI-driven workflows.
A few use cases I tried in this setup include:
- Creating epics and stories in JIRA based on a screen in Figma.
- Designing a Figma based on a story in JIRA.
- Translating the screen from English to French.
The potential use cases are numerous; I encourage you to explore them. If you have any questions, please don't hesitate to leave a comment below.